


My Tacoma Overland Setup — Alu-Cab Roof Top Tent & Explorer Canopy

By Rachel Joel · AZ Places
Rachel is the founder of AZ Places — Camping Made Easy — based in Arizona. A lifelong outdoor enthusiast, Rachel has personally explored and documented hundreds of camping locations, ancient ruins, ghost towns, hot springs, and wild places across Arizona, Utah, New Mexico, and the greater Southwest. She guides hosted camping adventures in the Apache-Sitgreaves National Forest, operates a firsthand bucket list of visited locations and maintains this complete site. When she's not on the trail she is a jewelry designer and a mother of two.
I did not set out to build an overland rig. It happened one piece at a time — the way most good things do.
The white Toyota Tacoma was already the right platform. A black Alu-Cab Explorer Canopy went on first in February 2022. The Gen 3 Expedition Roof Top Tent followed in July. A cupboard, recovery tracks, water storage, and a growing collection of camp-specific organization followed after that. The result is a truck that goes from highway to fully set up camp in minutes — a bed always made, gear always organized, and everything I need within arm's reach.
Here's how it came together, what it cost, and what I've learned from using it across Arizona and the Southwest.
The Truck
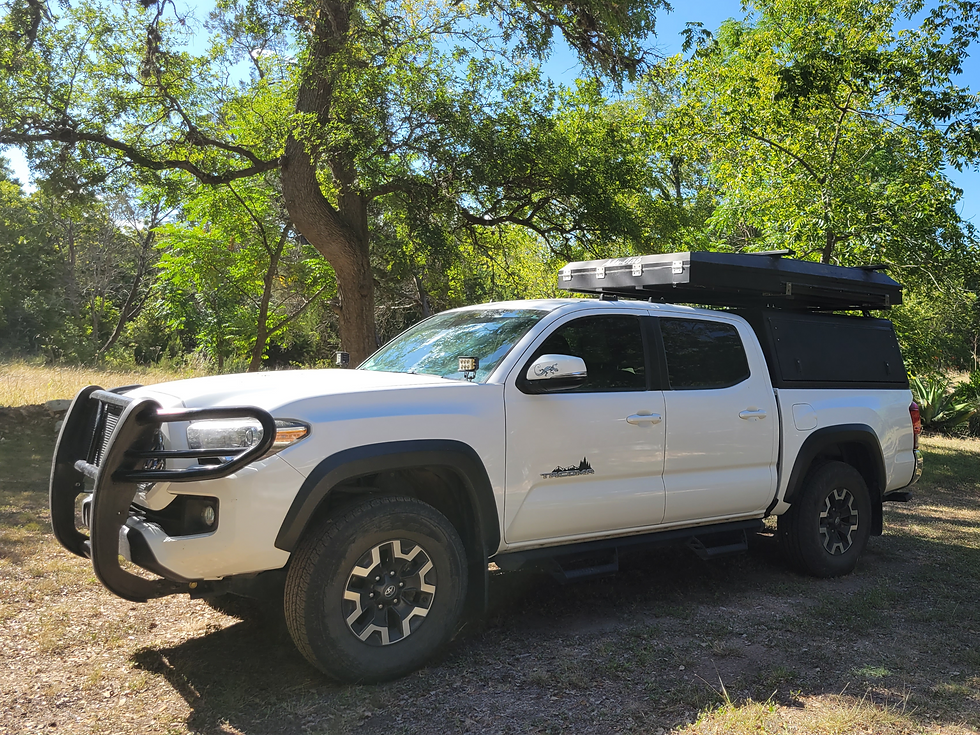
A white Toyota Tacoma — the black canopy and tent create a clean two-tone contrast against the white cab. Worth noting: the truck was subject to multiple Toyota paint recalls over the years. Everything but the bed has since been repainted under the recall. The bed lives under the canopy and stays protected — so the two-tone look works out regardless.
Modified for the kind of use we put it through:
Increased leaf springs — added for towing and off-road capability as part of the build done for the launch of AZ Places.
Tires — appropriate for mixed highway and dirt road travel.
Westin HDX Grille Guard — front protection. I've heard mixed reviews on the brand but it's on there.
Rhino Rack Pioneer Platform 52x49 — rode on top of the truck until the tent installation made that position unavailable. Currently being cut down to fit above the cab — when reinstalled it will restore the exterior storage capacity that came off when the tent went on.
The Alu-Cab Explorer Canopy — February 2022
The canopy went on first — the foundation everything else is built around. I ordered through OK4WD. Cost: $3,370 with tax.

The Explorer Canopy is made in South Africa by Alu-Cab — a company that has been building overland equipment for the African market for decades. The aluminum construction is genuinely robust. The black finish matches the tent exactly. One rear window provides visibility — it does not open. I've been considering adding a grate or a curtain since the truck bed contents are visible from outside. The Alu-Cab branded grate is the clean solution but priced accordingly — still deciding on the right approach.
Inside the canopy:
The interior is where the real organization happens. Along the rails I've mounted:
A shovel along the top back rail — easily accessible without unloading the bed
Eyebolts with carabiners along the rails for hanging bags, a trash bag, and other items that need to be off the floor
A hanging duffle behind the cupboard holding hammocks, a lightweight sleeping pad, and a down blanket
Even with the full setup in place, there's still room to sleep in the back of the truck. Luca does this regularly — and has done it in some memorable locations.
On the outside of the canopy, hooks on the side rails provide hanging space for gear at camp — my daypack lives on that hook when we're set up.
The Canopy Cupboard — September 2023

The 750mm Alu-Cab Canopy Cupboard went in on the driver side in September 2023, along with push button lock covers. Cost: $299. The driver side placement was deliberate — it's the first thing accessible when I open the canopy, and it holds everything I need quickly at camp.
Lights, camp stove with fuel, hammer, saw, fire whistle, repair supplies, paper towels, mess kit, and more. Everything has a place. Setup goes faster when you know exactly where everything is. The cupboard alone changed how I approach arriving at camp — from hunting through the bed for gear to having everything at hand in seconds.
Recovery Tracks — November 2023
The GoTreads XL recovery tracks went on the passenger side in November 2023 — mounted using custom brackets I fabricated from file folders and aluminum strips. Cost: $160. The passenger side made sense since that's where we use the ladder to access the tent.
GoTreads Recovery Tracks GoTreads Recovery Tracks Installed GoTreads Recovery Tracks Installed
The GoTreads haven't been used for a recovery yet — they came after a mud incident in Sun Valley that clarified the value of having them. They double as leveling blocks, though most of the time rocks do the job just as well. They're there when needed and out of the way when not.
The Alu-Cab Gen 3 Expedition Roof Top Tent — July 2022
The tent is the centerpiece of the build. The Gen 3 Expedition — now updated to the Gen 3-R — is a hardshell roof top tent that opens in seconds, sleeps two comfortably, and closes just as fast. Weight is approximately 194 pounds. Top load rating is 110 pounds. Two Water Rotopax containers ride on the top bars of the tent — accessible from above, keeping weight centered and out of the bed.
New price at the time: approximately $4,200 plus tax, around $4,600 out the door. I found mine on Craigslist — never used, blocks from my parents' house in Texas. They picked it up and months later I drove from Arizona to get it. Paid $3,000. It came with load bars included.
The Gen 3-R is the current version — worth looking at if you're shopping now:
What I love about it:

The bed is always made. Pillows, blankets, and gear stored in the pockets — open the tent and it's ready. From an overland travel perspective where you're moving from one camp to the next, you simply can't beat the convenience of a pop-up roof top tent. No tent to pitch, no sleeping bag to unroll, no gear to relocate. Open, place the ladder, climb in, done.
The side rain cover deploys over the ladder — a detail that matters more than it sounds. At Sunny Flat Campground in Cave Creek Canyon during six hours of monsoon rain, the rain cover meant getting in and out of the tent without soaking the interior. We stayed completely dry while the canyon around us turned to mist and the thunder rolled both directions through the rocks.
At Alamo Lake during the windstorm that turned the lake into an ocean — the tent performed. You hear the wind working the rain covers, the same as any tent in those conditions. But the hardshell structure doesn't flex the way a soft shell would. It held.
We get attention with this setup. At the Navajo Nation Fair in Window Rock — September 2025 — we camped roadside with everyone else waiting for the parade. Had the tent up and watched the parade from it. Plenty of people came over to look.
The one time it nearly went wrong:
At Muley Point in Utah — perched 2,400 feet above the San Juan River canyon — we started driving away from camp with the tent still open. A passing car flagged us down immediately. Tent was fine. Pride took a small hit. Check that the tent is closed before moving. Every time.
After four years of use the screen on one side is showing wear from climbing in and out. Expected for the use it gets. Everything else is holding up well. We never bothered to hook up the interior lighting — the tent came with it but it hasn't been a priority.
One maintenance lesson — air it out
After four years I'll add one practical note that anyone considering a roof top tent needs to hear: air the tent out after every trip, especially if you camped in wet or humid conditions.
I learned this the hard way. After a trip with wet weather I packed the tent without giving it adequate time to dry. Mold developed on the mattress and floor. Treating it meant washing the mattress cover, spraying down the entire mattress and floor to kill the mold, and letting everything dry completely before closing it back up.
On Reddit someone recommended two products that work well for this:
Both are worth keeping in the kit if you camp in monsoon season or anywhere with high humidity.
The simple habit that prevents all of it: after every trip, open the tent and let it breathe for several hours before closing it for storage. If you camped in rain, give it a full day if you can. It takes five minutes of attention to avoid a problem that takes hours to fix.
The Setup in the Real World
What strikes me most after four years with this configuration is how much it changes the rhythm of a trip. Rolling into camp at dusk after a long drive — the kind of arrival where a conventional tent setup would mean 30 minutes of work before you could sit down — becomes a five minute process. Open the canopy, open the tent, pull out the camp chairs, done. The cupboard is open and the stove is out while the tent is still going up.
For a trip like the Chiricahua Mountains loop — four days moving between Sunny Flat, Herb Martyr, and Pinery Creek — that efficiency compounds across every stop. You're not managing gear. You're camping.
What's Next
The Rhino Rack Pioneer Platform above the cab — once trimmed to fit — is the main remaining item on the build list. It will restore the exterior storage that came off when the tent went on and give the roof a cleaner, more purposeful look.
The canopy window situation is still unresolved. An Alu-Cab grate would be the clean solution. A DIY curtain is the economical one. Still deciding.
Cost Summary
Item | Cost |
Alu-Cab Explorer Canopy | $3,370 |
Alu-Cab Gen 3 Expedition Tent (used) | $3,000 |
Alu-Cab Canopy Cupboard 750mm | $299 |
GoTreads XL Recovery Tracks | $160 |
Total to date | $6,829 |
Have questions about the build? Drop them in the comments — happy to share more detail on any part of the setup.



Comments